

Changing old, replacing new hardware in a computer may seem simple at first, but due to lack of experience, many people still make mistakes that cause significant harm to their system.
RAM
Memory manufacturing companies often provide RAM in a variety of configurations, capacities and speeds. If the store you are visiting does not have the type of RAM your computer requires, go to another store and choose carefully until you get the right RAM you need, because if it is not installed correctly, you can will ruin your computer, and of course the store sells the RAM will not compensate for such incidents.
The biggest mistake when upgrading RAM that even experienced people often suffer is to forget to check the limit of the amount of computer RAM. Some netbooks and ultralight computers usually only accept a certain amount of RAM. So if you see a 4GB RAM that seems to fit in your computer, don’t rush to buy it right away but check it again, knowing your computer only supports 2GB of RAM.

Processor
Microprocessors are like computer brains, so only a small mistake when upgrading will lead to serious consequences for the computer. On the surface each CPU has many small pins, assembled with the motherboard socket to create a path to transfer data in the computer. If only one of these legs is warped or cracked, the computer will immediately experience problems. So when holding the processor in your hand, be very careful to avoid exposing it to anything, and when assembling it into a socket, don’t be too strong, but gently select the CPU pins to fit it properly. socket.
Between the CPU and the radiator there is a layer of thermal paste that releases heat from the CPU to the heat sink. To ensure the stability of the whole process, the glue must be smooth, thin and evenly spread. When replacing CPUs, many people often remove the glue, or “be careful” to apply a new layer of glue to the old glue, but this will actually have the opposite effect, because the two layers of glue will clot. together, making heat transfer less efficient. To limit this, wipe off the old glue and apply a thin layer of glue before attaching the new processor to the correct position.
Finally, avoid using heat sinks that are not eligible to release heat to the new CPU. If the new processor is faster than the old one, it will also generate more heat. So unless you already have a high-performance heat sink before, be prepared to replace the new radiator. There is no need to spend too much money on expensive liquid cooling systems, but if you have used $ 300 for a new processor, spend an additional $ 30 for a more efficient radiator. Leaving that much extra money to protect the safety of the first $ 300 is thought to be a must!
Hard Drive
Usually the hardest part when replacing a hard drive is to screw the screw to mount the drive to the storage tray, because many cases can only open one side, or there are other components that block the way of contact with the hard drive. You also should not be impatient, just attach screws to one side, because once the hard drive is loosely attached, it will vibrate during operation, creating lots of noise while reducing the life of the drive.
If you find it difficult to insert the drive into the storage tray, remove the tray completely, attach the drive to the tray, and return to the old location. If you take care of this step right away, you will have an ultra-smooth running computer and complete peace of mind about your drive life.
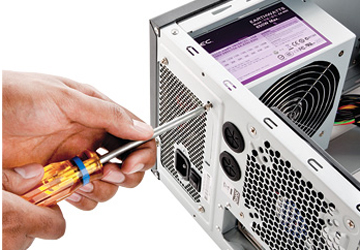
The source
After upgrading some important hardware, the machine’s power needs may exceed the capacity that the current power supply can meet. This is especially true for the machines that have been upgraded to the graphics card – the more powerful they are, the more power they will consume. For example, the new GeForce GTX 295 card has four times the power consumption of GeForce 8600 cards.
So before upgrading a certain piece of hardware, take a moment to assess whether the current power supply is capable of “handling” those hardware. In addition, upgrading to an appropriate power supply will also help the system run faster and more stable.

Cable
You are excited about the new components to the extent that after installation, you sit right on the computer and enjoy the outstanding advantages of the machine and still let the cables hang in the case? This is a big mistake because it will significantly affect the heat dissipation process of the machine. A good heat dissipation mechanism will help the system work stably, especially when the machine has just been upgraded with more powerful hardware – which also means more heat is generated around. If you block the air flow with cables like spider webs, you directly reduce the performance of fans and radiators. In contrast, neatly arranged case cables will make air flow easier and keep the case cool. No need to be fussy, you just need to go to the grocery store to buy a chain to tie the strings together neatly enough.
Data transfer
This is a job that will take a lot of your time, even if you choose the wrong method, it takes a whole day to keep an eye on your computer. This is really a big problem for busy people, especially when you cannot manipulate anything on the computer until the data transfer process is complete.
Although Microsoft has integrated the Easy Transfer utility to support data transfer on Windows 7 and Vista, but the software used is quite complicated, not to mention you have to transfer all data to an external drive before switching to new drive.
It’s much simpler and faster if you use hard drives from big brands like Seagate or Western Digital. For example, with the Seagate drive, you are provided with a free utility called DiscWizard to install on your hard drive to transfer data, then remove the drive and connect to the new hard drive via USB port and a SATA adater / IDE buys at computer parts stores. After launching the software, proceed to copy the image file (file that stores all the data of the old drive) to the new drive and complete the data transfer process.
Upgrade BIOS
Many people usually only care for the processor, RAM and graphics card, but rarely pay attention to the BIOS, one of the most basic parts of a computer. What you need to know is that a new set of BIOS will also significantly reduce boot time without upgrading any other hardware. Like other components, the manufacturer also regularly updates the BIOS to support current standards, fix bugs and add new features.
If your computer has been active for a few years, the BIOS of the device is likely to be out of date. To see if the BIOS has this problem, monitor the screen at the first startup, or type msinfo32.exe in a specific run and view. If the BIOS is out of date, please visit the manufacturer’s website to download the latest BIOS version. Before installing, turn off all running programs, launch the downloaded utility and sequentially follow the instructions. This utility will restart the computer, install the BIOS update to the computer and reboot again. In some cases, you may have to burn this utility to a CD drive or save it to a virtual drive and install it from here. One thing to remember is not to disconnect or interrupt the update process as this will lead to unforeseen hazards for the computer.

Graphics card
Compared to other computer components, graphics card upgrade errors occur most frequently due to user negligence. The upgrade of graphics card often has problems due to the following 4 factors:
- Bus interface
- Power supply
- Slot size
- Operating system version
If you’re going to buy a new graphics card, you need to check all 4 factors to make sure your computer supports that card type. Older machines and budget machines may have an AGP interface instead of the common PCI-Express interface. In addition, the power supply of these computers is often quite weak, may not be able to support today’s high-performance graphics cards. Check the power of the graphics card to ensure that the power supply the PC provides is sufficient for it. In addition, you also need to check if the graphics card you are planning to purchase fits in the case in the case, and whether the driver for the operating system is supported.
Re-activate Windows
After upgrading one or more important hardware, Windows may ask you to reactivate the operating system to control copyright fraud. At first activation, copyright information is saved by Windows along with the basic parameters of the machine such as motherboard, processor, graphics card … next to the series number of some other components. Like the human fingerprint, Windows uses it to identify the actual configuration of the computer each time it starts. If one or more of the components are changed, Windows may ask you to reactivate the operating system.
Of course this is a very normal thing so you don’t have to worry, unless you’re using a “pirated” version of Windows. To re-enable Windows, you need to enter the admin password and possibly the activation code associated with the version of the operating system you are using, so be prepared with these data before upgrade.
Upgrade receiver – Wi-Fi transmitter
Many people buy a Wi-Fi transceiver, plug it into a computer and start using it without paying attention to changing the settings of the system, so they have left the door open to anyone who uses it. This wireless network. So after purchasing this device, you should at least reset the password to gain administrative rights to avoid future problems.
Another common mistake when using Wi-Fi is that users are “lazy” to update the firmware for the transceiver. The 802.11n standard transceiver usually has an administration menu to control the system and install new firmware versions that run on the receiver itself, but few people pay attention to this menu. If you haven’t updated your Wi-Fi transceiver, log in immediately to your admin account and do this as soon as possible. After pressing the update button, do not interfere until it restarts automatically, indicating that the update process is complete.


